The following is a step-by-step guide to getting PC-GAMESS 6.4 (perhaps prior. I'm not inclined to check, but would appreciate a confirmation) running on a(n) SMP (that's Symmetric MultiProcessing (useless trivia), a single motherboard with multiple processors) system. All of the websites describing what's below are less… obvious than I would like, especially concerning the infamous .pg file for SMP machines. What's below is specifically geared for a dual-core/dual-board (four processor) system, but is easily changed to other SMP cases.
1. Obtain the most recent (6.4 as of this posting) version of PC-GAMESS from the good Dr. Alex Granovsky.
2. After extracting the contents of the downloaded .exe file, you'll notice the wmpi1_3.exe file. Double click to install this program, blindly saying yes to everything it asks.
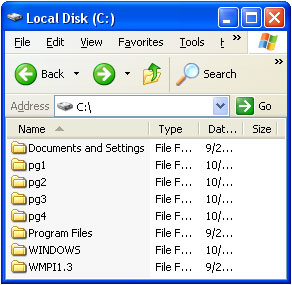
3. In your c:\ directory (dig into My Computer), create the sub-directories pg1, pg2, pg3, and pg4 (note: the names are completely arbitrary). When that's done, your folders should look like the following (PEXECUTE.BAT and PRUNGAMESS.BAT are separate batch files you can download below):
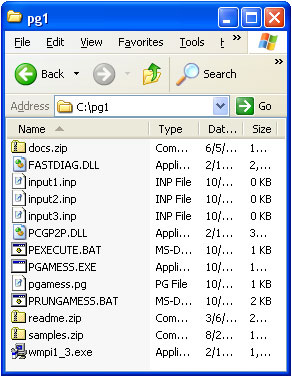
4. Into c:\pg1, place all of the extracted PC-GAMESS files (whatever came out of the .exe run). The folder should look like this (with three input files added by myself for testing):
5. Into the folders c:\pg2, c:\pg3, and c:\pg4, copy and paste (from c:\pg1) the files FASTDIAG.DLL, PCGP2P.DLL, and PGAMESS.EXE. These directories will look like the following:

6. Back in c:\pg1, create or place pgamess.pg, the wmpi config file you can download HERE (if you download, remove the .txt extension before use). The file is, simply,
local 0
localhost 1 c:\pg2\pgamess.exe
localhost 1 c:\pg3\pgamess.exe
localhost 1 c:\pg4\pgamess.exe
No surprises, but I've never found the SMP .pg file listed anywhere. This file is just for SMP runs. local 0 refers to the "base" copy of PGAMESS (in c:\pg1, the PC-GAMESS home directory). The localhost 1 lines call each of the other three directories and PGAMESS.EXE for the three remaining processors (in the quad box). For a dual core or dual CPU box, you'd remove c:\pg3 and c:\pg4 and delete the third and fourth lines in pgamess.pg.
7. The command line will look like the following (note: the input file must be named "input"):
c:\pg1> PGAMESS.EXE c:\pg1 c:\pg2 c:\pg3 c:\pg4 -p4local > filename.out
All should, in theory, work without hitch. For a batch-type system (you can't add new files, but you can run existing jobs in the same directory automatically and sequentially), download the files PEXECUTE.BAT and PRUNGAMESS.BAT and place them into c:\pg1 (make sure to remove the .txt extension before use if you download these). To run this script, simply double-click on PRUNGAMESS.BAT.
NOTE1: Of course, what's shown is not the most efficient way to run PC-GAMESS. For maximum speed-up, you'll want a single hard drive dedicated to EACH processor (so each temp file is being written to a different disk). Your folders c:\pg1, c:\pg2, c:\pg3, and c:\pg4 would then be c:\pg1, d:\pg2, e:\pg3, and f:\pg4.
NOTE2: A number of my calculations fail randomly with MPI memory allocation/write errors on dual core/dual cpu AMD Opteron machines running Windows XP. These errors are actually hard drive write problems and not RAM problems. You can get around this problem (errors and OK buttons will pop up) by running the calculations in-RAM (DIRSCF=.TRUE.) and ramping up the amount of used RAM (with the MEMORY= keyword).
A great example of philanthropy among the scientific web community. Thanks a lot, Gregory!